

PLANTTUBBY
A Ready to plant self-watering bucket
Disclaimer: Planttubby is provided as is without any guarantees or warranty. In association with the product, Health by Nature makes no warranties of any kind, either express or implied, including but not limited to warranties of merchantability, fitness for a particular purpose, title, or noninfringement of third-party rights. Use of the product by a user is at the user’s risk.
Thank you for your support!
Why a Planttubby?
A wicking system distributes the right amount of water to keep the potting mix at a consistent moisture level. This ensures that your plant is not overwatered during – or dries out between watering sessions, creating the perfect conditions for a healthier root system. The reservoir section prevents water from flowing away, and the lid keeps the moisture inside for longer. This saves water and also stores some water for when you are away.
How it works

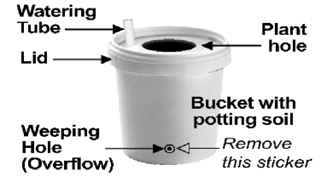
The plant is watered through the watering tube until it overflows at the “weeping hole”. Extra water is stored in the reservoir part of the bucket until needed. The “soil foot” or wick area is in the water and basically sucks water out of the reservoir as needed and delivers it to the potting mix.
Instructions
1. Remove the small sticker over the “weeping hole” on the front side of your Planttubby.
2. Remove the tape and circle insert in the lid.
3. Plant your new plant in the circle in the potting mix. DO NOT remove the lid. Ensure your plant will fit through the circle cut in the lid. Remove some of the potting mix to create a hole big – and deep enough for your new plant (not exceeding 15cm deep).
4. Remove your new plant from its container and remove any extra soil from the plant. Carefully loosen some of the roots on the outside and bottom.
5. Plant your new plant through the hole in the lid and fill the mix around the plant if needed from the mix you removed.
Important: To “activate” the system, drench the potting mix through the hole in the lid for the first 3 watering sessions and leave it for 30 minutes between sessions and with approximately 1 to 1.5L of water per session. Add some of the potting mix as need be between the watering sessions. Once the new plant and grow mix is settled, then fill the watering reservoir as mentioned hereunder. For the first 1–3 weeks after planting (depending on the speed of root growth of the specific plant), water from the top through the lid as well to ensure the roots grow deep enough to benefit from the wicking zone. Once your plant is settled, you only need to fill the reservoir as explained through the fill tube.
6. Remove the tape and reusable insert / cap from the watering tube. Water the plant slowly through the tube when needed and stop the moment the water comes out of the “weeping hole”. Replace the cap.
7. Add some potting mix if needed over time.
Tips
PLEASE NOTE: Moisture will not be spread right to the top, so ensure that the roots of the new plant will reach at least 15cm deep. If not, then water the plant through the hole in the lid until it is big enough to reach.
Place a planter saucer under your Planttubby if need be or if it’s kept indoors, to catch the water from the weeping hole.
When feeding the plant through the hole in the lid, add a bit of water at the top to ensure it dissolves into the potting mix.
Keep your Plattubby in a mostly shaded area to get the longest lifespan from it. The lid and handle might become brittle over time, but the bucket itself will last for years in some shade.
About Planttubby
Planttubby is assembled by hand and recycled bottles are used in an effort to help preserve our planet.
We use a top-quality organic potting mix as we believe it forms the basis for any healthy plant. It is a mixture of composted bark, compost and topsoil with a bit of peat (to transfer the moisture through the bucket) and some perlite (to help the airflow around the roots).
We also add a small amount of Lime (to ensure a more neutral PH) and Epsom salt (to promote root growth) to the mix. It is advisable to add a handful of each once a year through the hole in the lid. ![]()
Useful Links
Video links
| A short video to show how to setup your Planttubby | https://www.youtube.com/shorts/i_xT8pgkI-s |
| A longer video to show how to setup your Planttubby | https://www.youtube.com/watch?v=m_KycaRa6Nk |
Documents
| The Planttubby instruction page | Click here to download PDF |
Watch the videos on this page
A short video to show how to setup your Planttubby
A longer video to show how to setup your Planttubby